
Dave, my daughter has a Chromebook from school and her sister would like to also use it. I don’t want them sharing an account to ensure no files get accidentally deleted: Can you set up a second user on a Chromebook system?
While ChromeOS was always intended to be a very lightweight, browser-based operating system for low-cost school computers, rather surprisingly it does support more than a single user. Not only that, but it also has a convenient “guest” mode that lets someone else use the Chromebook without getting near the user files. In fact, if your daughter is only going to be using the Chromebook once in a while, that might be the easiest: Just convince her to sign in as guest.
Failing that, you can indeed set up a second account on a ChromeOS system, but you’ll need to start by setting up a Google account for them too, including a unique Gmail address. ChromeOS, of course, is built atop the Google software ecosystem, so there’s no way to sidestep the requirement. The easiest is to start here: Create a New Gmail Account.
I’ve done just that for my son, creating a brand new Gmail account for him that I’ll use as a second Chromebook account. Note: Since it’s impossible to take screenshots of the setup screens (since you’re not technically logged in to the device) I have had to resort to photographs of the computer screen throughout this tutorial, so the pics aren’t great. Hopefully, you can still follow along! 🤓
SIGN OUT OF CHROMEOS
The first step is to get to the login screen in ChromeOS. If your system is like mine, every time you wake the device you enter a PIN or your password and you’re looking at your Desktop and open apps. If that’s the case, click on the lower right of the Taskbar (“Shelf” in Chrome parlance):
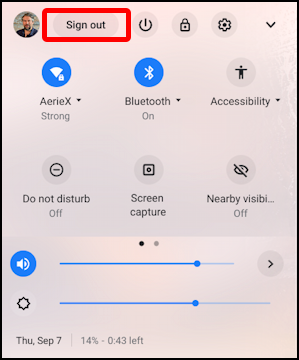
Click on the “Sign out” button, highlighted above. Now you’ll be back to your usual login screen with either a prompt for your password or PIN, depending on your configuration:
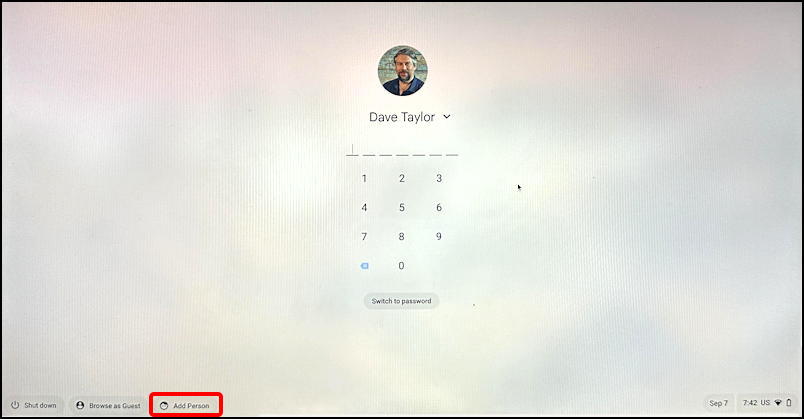
What’s important to notice here is along the bottom: “Add Person”.
ADD A NEW PERSON TO A CHROMEBOOK
Click on “Add Person” to proceed.
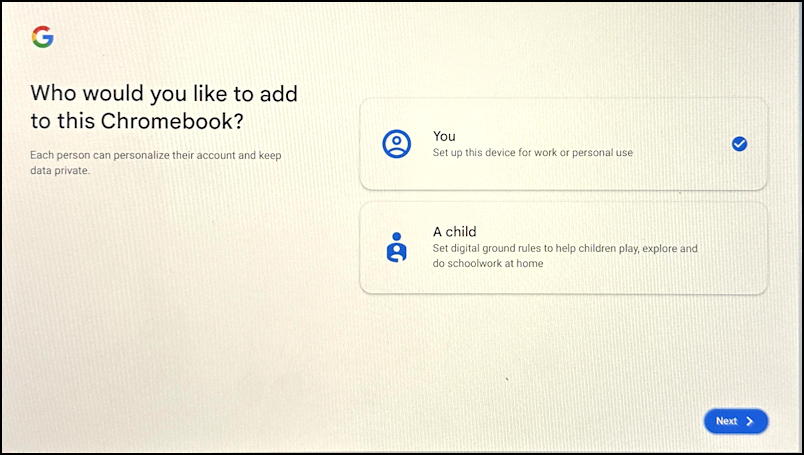
It’s a bit confusing because you might not want to use parental controls or you might want to have more than one adult sharing a Chromebook – for example, for testing purposes – but Google doesn’t envision that scenario. The secret? Choose “A child” then omit setting up the parental controls later in the process.
For this step, choose “A child” and tap or click on “Next“.
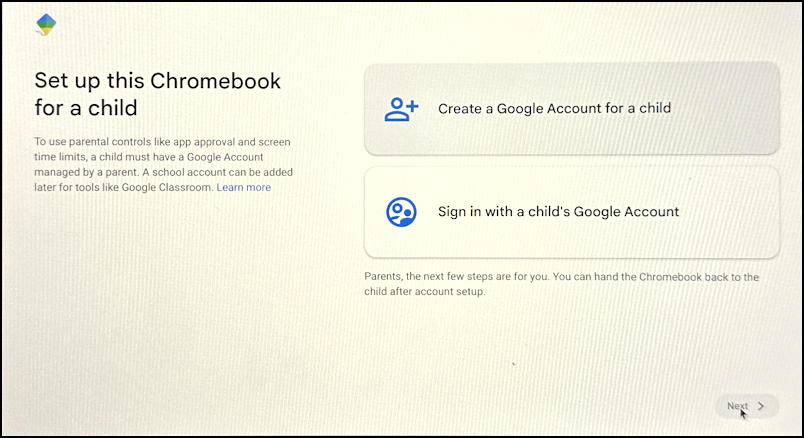
At this point you can actually go through the steps of setting up a new Google (Gmail) account for the other user, but since I’ve already done that for my son, I can simply sign in to his account through the “Sign in with a child’s Google Account” link. Again, if it’s not a child account, it’ll still work fine.
SIGN INTO GOOGLE WITH A CHILD ACCOUNT
Nomenclature, right? Anyway, click the link, then enter the new account’s email address…
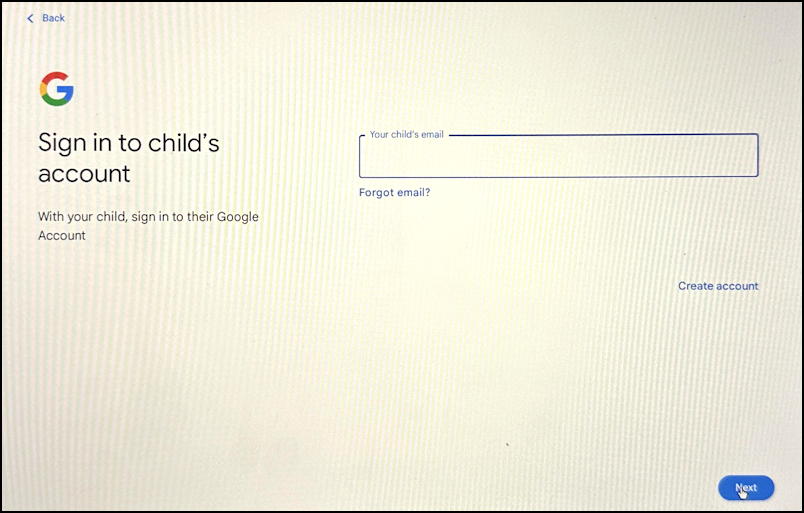
As far as I can ascertain, you’re really just adding a second Google account and there’s nothing inherently special about it being a child account or not. The only difference is in the next step once you click “Next” and enter the new account password correctly too:

So even Google is punting here, saying that you can add Parental Controls (which are useful in many situations) but not quite at this point in the process. Okay. Click on “Continue” and it’s time for Terms & Conditions:
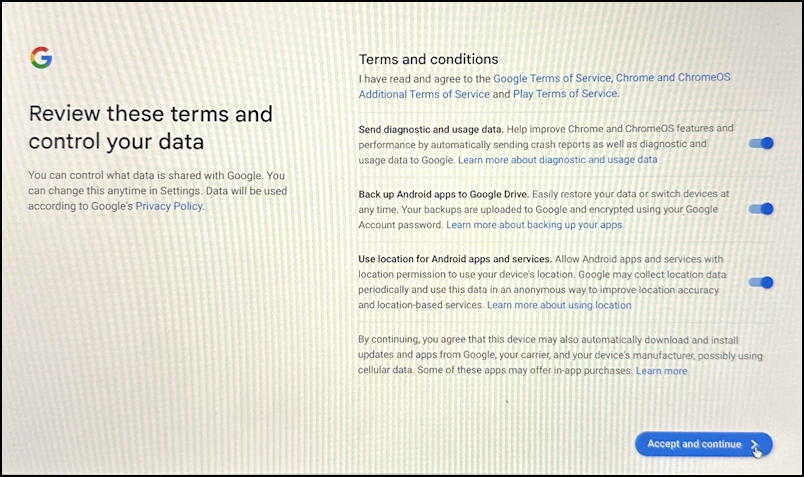
If this is an account for a child, I encourage you to think carefully about whether you want Google to receive usage data as part of its diagnostic communication with their servers (the first option). The other two are likely more benign, but, as always, read through the options carefully and remember that you can opt out of everything without any ill effect.
To proceed, click on “Accept and continue” once you’ve ensured the settings are appropriate. One more setting:

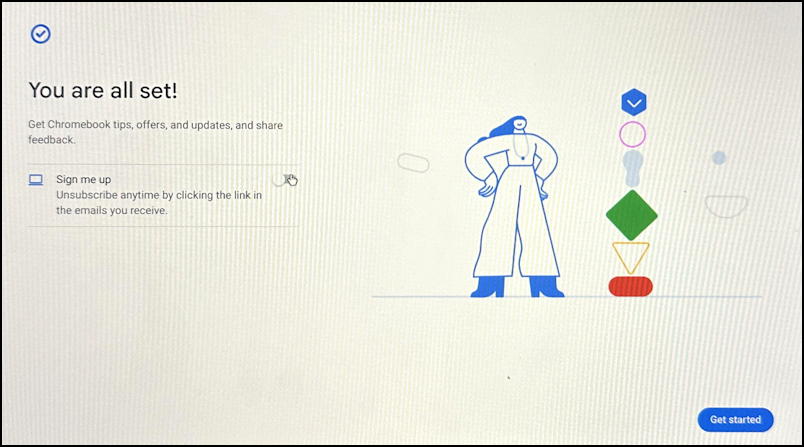
This is a feature you do want to enable because it’s really what makes a Chromebook so useful: Everything’s in sync with the Google server so that even if your daughter lost the computer, all the files would be safely backed up.
Ready to be done with the almost endless configuration adventure? Click on “Accept and continue” one more time…
CONTROLLING ACCESS TO A CHROMEBOOK ACCOUNT
The final step before you’re done with the new account setup is to decide how your daughter is going to verify her identity. If the Chromebook has biometrics (e.g., a fingerprint scanner) that’ll be an option, or the original password you entered, or, what I prefer, a PIN:

ChromeOS insists that it be at least 6 digits long, which is a bit annoying, but I suggest that she use something easy to remember like your phone number or grandma’s phone number. Enter it twice, click “Next“, and… finally…
A lot of steps, but fortunately you only have to do it once and now your daughter is all set up with her own account on the Chromebook and in the Google world too. Want to add parental controls? Here’s a good tutorial: Add Parental Controls to Chromebook Accounts.
Oh, and now when you get to the login screen it looks a bit different:
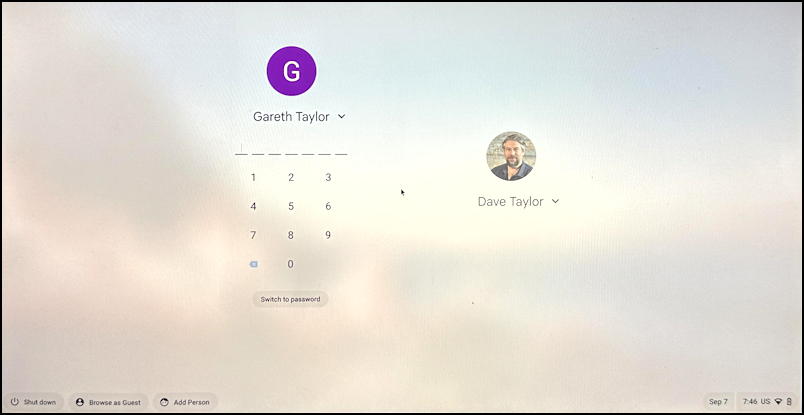
Mission accomplished!
Pro Tip: I’ve been writing about operating systems for many years. You can find a lot more useful tutorials about Chrome OS in my ChromeOS and Chromebook help library here on the site. Why not check it out while you’re visiting?