
Dave, I just upgraded to MacOS 15.4 beta and Apple Mail no longer shows most of my email?! What the heck? How do I fix it and, if it’s related to “categories”, how can I just disable categories in the new Apple Mail?
Whether it’s super fancy AI or just a simple improvement to help users with usability, it’s invariable that change begets some level of unhappiness. In a world where everything can seem in flux, we’re all very sensitive to changes with common tools and utilities like Apple Mail. Categorization of incoming mail to help manage the inbox has been a mainstay of other email systems for years; Gmail added tabbed categories back in 2013!
The first time you use an email program that’s sorting and organizing incoming email it can be jarring, however. Do your junk messages get automatically routed to the spam folder? Yeah, but that’s been around forever and you probably never even check to see if it’s working properly. But I had the very same experience with Apple Mail when I switched to the beta of MacOS 15.4: Apple Mail on my phone was showing eight messages, but Apple Mail on my Mac showed ZERO. What the heck?
Shortcuts: How Categories Work | How to Recategorize Senders | How to Disable Categories
Because most users probably won’t enable a new feature that changes basic workflow, Apple opted to do what many tech companies choose, to enable the new feature by default. Having used it for a while, however, I will say that it’s pretty darn helpful. The categorization needs a bit of training, but then again, I’m still training Gmail – 11 years later – on what I consider Promotional and what I think is worthy of being in my primary inbox. Let’s have a look at how it works, how to train Apple Mail to correctly categorize your messages, and, yes, how to disable it if you just can’t stand this new feature.
HOW CATEGORIES WORK IN APPLE MAIL
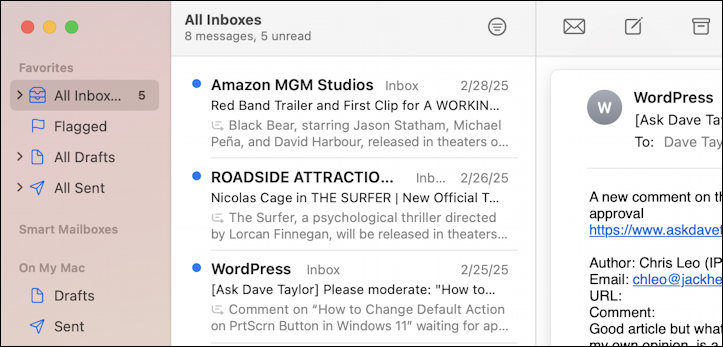
As I said, when I launched Apple Mail in the new beta, I was disconcerted to see an empty inbox when my iPhone was insisting I had eight messages:
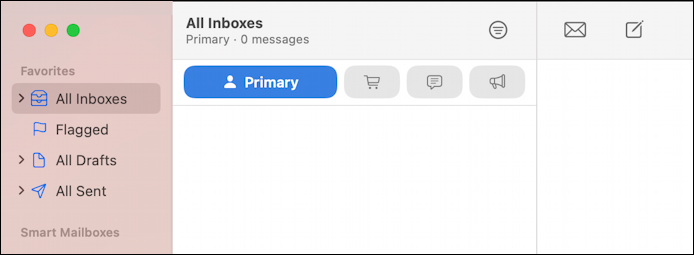
What’s new here is that big, bold “Primary” button and the three additional buttons: Transactions, Updates, and Promotions. These are the four categories of mail and what it’s really showing me above is that I have zero messages in my Primary inbox. A click on the shopping cart reveals my Transactions inbox:
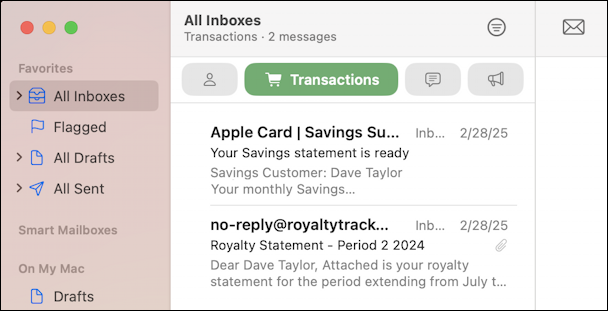
Again, notice along the top it shows “Transactions • 2 messages”. Are there messages in the other category areas?
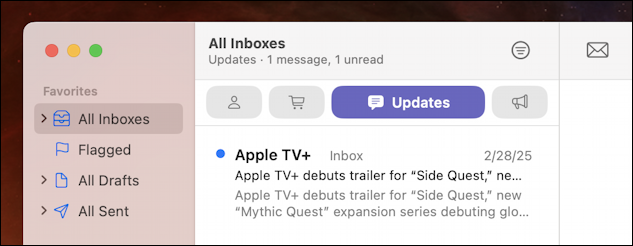
Yes, yes there are…
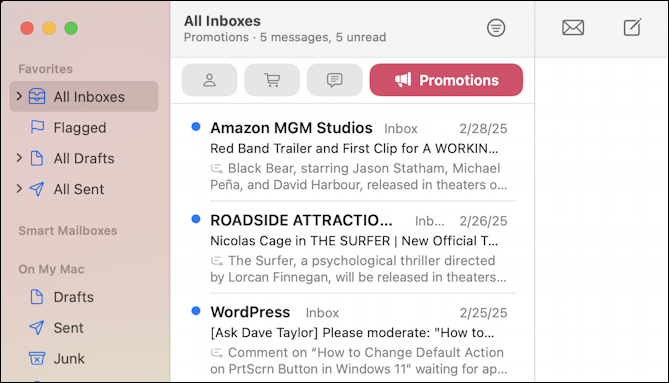
So that’s the mystery solved: My eight messages were sorted into Primary (none), Transactions (two), Updates (one), and Promotions (five). See how that works? It’s actually quite helpful because important email messages won’t get lost in a stream of newsletters, site updates, adverts, and other miscellany.
HOW TO CHANGE MESSAGE CATEGORY
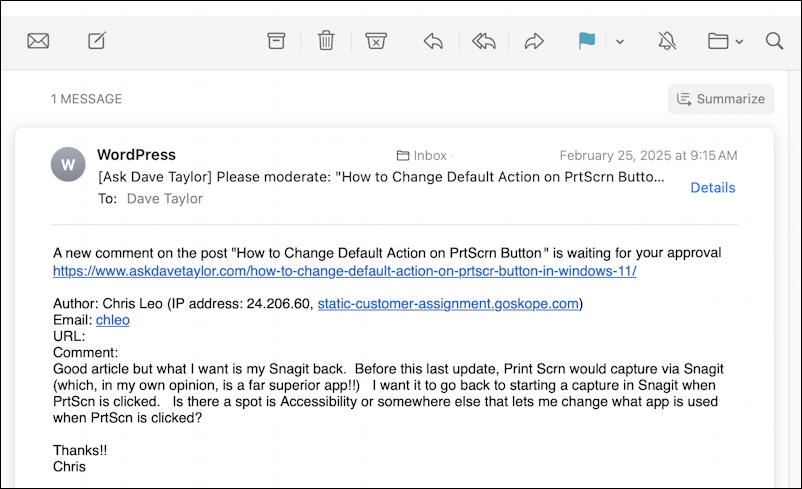
Having said that, notice that an email from my WordPress system – this site, AskDaveTaylor.com – has ended up in Promotions. That’s not good, I want to see requests for moderation of comments in my primary inbox! This is a chance to teach Apple Mail how to categorize this particular message.
Click to read the message and by default, there’s no new Categorize button:
If you’re motivated, you can actually update the toolbar along the top in message view to add a new Categorize button, but by default, you have oodles of options, but nothing that’ll help update the category.
That feature is found by Control-Clicking on the message in the index view:
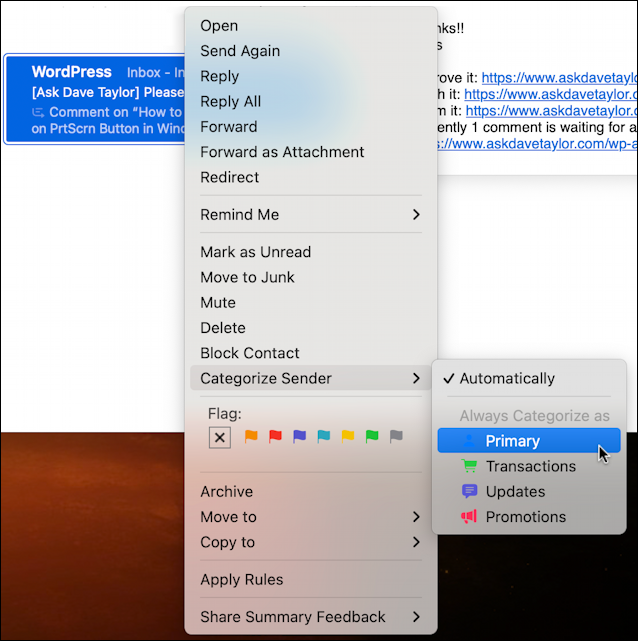
Notice that I’ve selected “Categorize Sender” and am then able to leave it as the default of “Automatically” (which, in this instance, is wrong) or change it to the specific category I prefer: “Primary”. Apple Mail will confirm what’s about to happen:
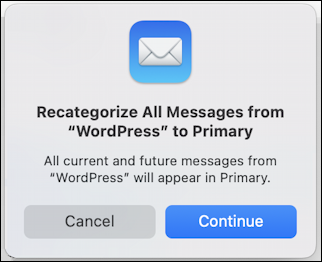
Maybe a bit tedious the very first time you open up the new APple Mail but remember that you’ll only have to do this once for each sender to get everything organized as desired. Click “Continue” and it’s saved, along with the current message being moved to the desired Category too.
OKAY, HERE’S HOW TO DISABLE CATEGORIES
Tried it for a few days and still find categories super frustrating? You can disable this new feature entirely if you want. It’s not in Settings, however, it’s part of the “View” menu. Click on “View” on the menubar…
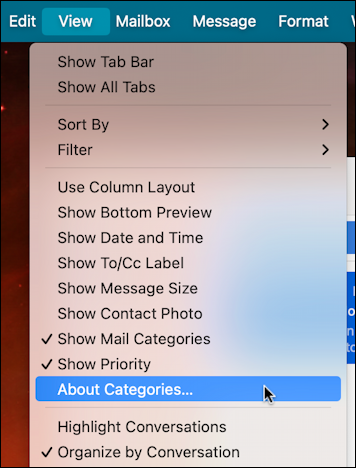
This is a super long menu, I’ve chopped it in half for simplicity, but there are a lot of additional options!
Before we completely disable the feature, choose “About Categories…” to see how Apple describes these four different categories:

Did you catch that “when a message in Transactions, Updates, or Promotions includes time-sensitive information, it will also appear in Primary”? Good to know.
Tried re-categorizing, but want to just wipe all that and start over? “Reset Manual Categorization” offers just that feature.
Still a no go? Okay, go back to the “View” menu and choose “Show Mail Categories” to unselect it. Instantly you’ll go back to the old Apple Mail single inbox view:
That’s it. I encourage you to give the new Apple mail categories a chance over a week or two, but if you don’t want to learn a new trick with as core a utility as your email program, no worries, now you know how to disable this feature. Good luck!
Pro Tip: I’ve been writing about MacOS since the first release and have hundreds of helpful tutorials here on the site. Please check out my Mac help library for lots more useful content while you’re here!