Dave, I saw a colleague who has all of their desktop file and folder icons neatly organized with the label to the RIGHT of the icon, not below it. For folders it also listed the number of files in the folder. I want! How do I set this up on my MacOS 14 system?
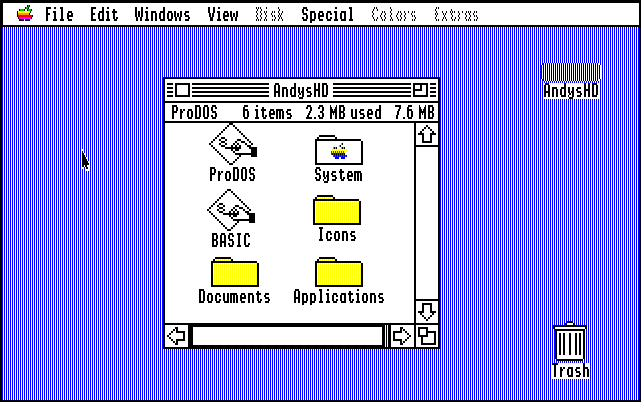
It’s pretty amazing just how long the Mac operating system has included a file browser called the Finder. Before there was Mac there was the Apple II, a groundbreaking home computer that launched Apple Computer back in the dawn of the computing era. It had a file browser that showed almost exactly the same icons for files, apps, and folders! That also had the name of the item below it, so that organizationally there was already standardization in the interface. Zoom forward quite a few years and Mac, Windows, Linux, even ChromeOS use the same basic grid layout with icons to represent files, folders, apps, etc, and labels immediately below them.
Open up a Finder window in the modern Mac operating system, however, and there are quite a few different ways you can view the contents of the current folder, from a line-by-list “list” view to a large image browsing “gallery” view that’s perfect for folders full of photographs or other images. None of those can be applied to your Desktop, however, because it’s hardwired to the icon-with-label layout. Well, sort of…
MACOS: TESTING OUT STACKS
One of the additions to sneak into MacOS a few years ago was a layout feature called “Stacks”. The idea is that you can have piles of similar objects on your desktop as a way to organize it more neatly, and it’s particularly effective if you have a bunch of, say, PDF documents, spreadsheets, and photos sprawled across the Desktop. To see how it works, I’ll start with a couple of image files and folders in the regular Finder view:
![]()
This is probably what you’re used to seeing, with preview images and the labels immediately below each icon. Control-click on a blank spot on the Desktop and you’ll reveal its context menu:
![]()
As shown, choose “Use Stacks” and be prepared for a pretty dramatic change to your Desktop! Everything is organized in neat piles, which can be a startling change:
![]()
All of my images – I have about 25 on my Desktop currently – are piled into one icon labeled “Screenshots”. The folders don’t change, but it’s still quite a change from the standard one-icon-per-file-or-folder display. If you go back to the context menu – with Control-click – you’ll find that you can choose how these Stacks are organized too:
![]()
Or you can choose “Use Stacks” again to return to the previous display. I have to admit, I’m not much of a fan of Stacks myself, but can see where it would be helpful if you have huge numbers of files and want to get a quick handle on it. For the remainder of this tutorial, I’m going to disable Stacks.
MACOS: CHANGING DESKTOP DISPLAY PREFERENCES
With everything back to its original state, let’s consider your question about how to move the icon labels from the bottom to the right. This is done by choosing View > Show View Options while looking at your Desktop in the Finder or using the handy keyboard shortcut Control-J. A different menu appears:
![]()
If you seek to customize your Finder view, this menu is your best friend! You can change icon size, change grid spacing, and change text size, among other things, something I always change when I move onto a new Mac for any reason. You can see I like 48×48 icons with a slightly larger grid spacing. Experiment with moving those two sliders to see how it affects your Desktop display.
Now look at the “Label position” and notice it has two settings: Bottom and Right. Choose “Right”…
![]()
That answer the question of how to move those labels, but while you’re at it, choose “Show item info” from the View Options window. Those folder item counts will suddenly show up!
![]()
Images are shown with their dimensions, folders get their included item count. Some icons don’t have additional info, but it can definitely be helpful to have this additional information displayed.
One last demonstration: What about if you turn off the “Show icon preview” option and turn on Stacks? It’s pretty interesting, actually:
![]()
Armed with all of this information about settings and options in the Finder, you can now go forth and tweak your own Mac Desktop to meet your needs with just a few clicks. Good luck!
Oh! Before we wrap up, here’s an image of the Apple II display of files and folders:

Surprisingly similar given how long ago the Apple II was introduced!
Pro Tip: I’ve been writing about MacOS since the first release and have hundreds of helpful tutorials here on the site. Please check out my Mac help library for lots more useful content while you’re here!
